


Our Guide to DIY Floral Arrangements & Bouquets
April showers brought the most beautiful May flowers. With Mother’s Day, Teacher Appreciation Week, and spring bursting with florals, this is the perfect time to treat yourself, mom, or the special teacher in your life with a personalized floral arrangement/bouquet. It’s also the ideal time to add vibrant colors to your home. At Westchester Family, we find joy in making unique floral arrangements for our loved ones and ourselves. Getting creative and making our own arrangements or bouquets gives us a perfect break from our busy schedules. Today, we’re bringing you our “DIY” guide for the perfect floral arrangement in your home and an inexpensive way to make your own bouquets to gift this season.
Be sure to check out 2024 Spring Fairs and Craft Festivals in Westchester
What You’ll Need:
flowers
greenery
floral tape
ribbon (optional)
scissors
a vase or container of choice
a brown paper page (for gifting bouquets)
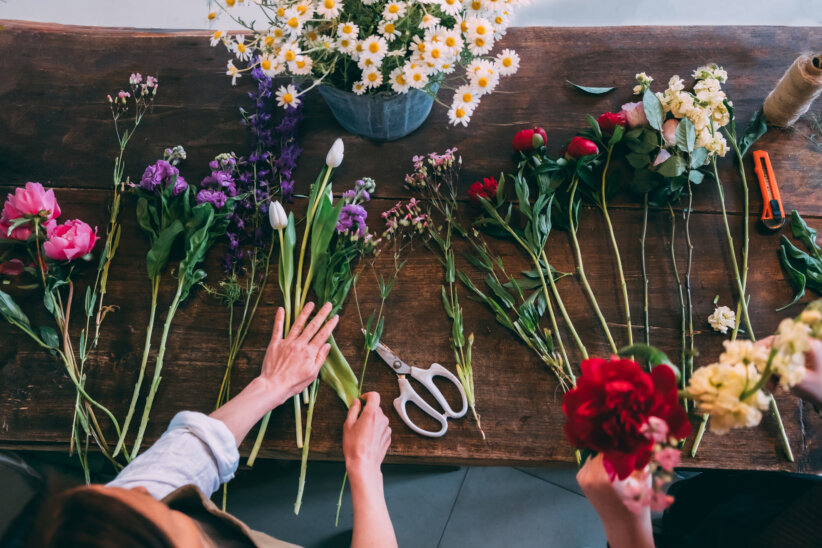
Collect Your Materials
Choose a variety of flowers in different shapes, sizes, and colors. You can choose whatever is in season or is your favorite. Let your creativity soar, and really have fun with your choices.
Prepare Your Workspace
To start, we will clear a clean, flat surface to work on. While you prepare your space, put your flowers in a vase or container with water to keep them fresh. We suggest sourcing your flowers from a local florist or favorite flower shop. Support small businesses!
When choosing a vase or container, consider the size and shape of your arrangement. A taller, narrower vase is ideal for a bouquet with long stems, while a wider, shorter container works well for a more compact arrangement.
Trim the Stems
Using sharp scissors, trim the stems of your flowers at an angle. This is important because it allows for more water intake and keeps your flowers fresher longer. Remember to remove any excess leaves or thorns. If using a vase or container, we want to make sure no leaves are at the bottom of our flowers to help maintain clean water for longer.
Prepare Your Vase/Container
Grab floral tape and prepare your vase/container using the quick and easy grid method. Using floral tape, you will create an invisible grid on the top of your vase. Here’s a quick video tutorial from The Floral Coach if needed. The grid method is a simple way to ensure that your piece has the desired look and is a great way to guarantee that your flowers aren’t unnecessarily drooping. You will be placing your flowers between the squares made from your grid.
Create a Focal Point
We’re ready to create our pieces. Grab one or two flowers that catch your eye the most. These flowers will be your focal point and base for your arrangement or bouquet. When choosing your focal point, consider slightly larger flowers with a unique color or shape. Place them in the center of your vase, or lay them on your flat surface if you create a bouquet.
Add Flowers and Greenery
Gradually add more flowers and greenery around the base, rotating the bouquet and vase as you work to ensure even distribution. When choosing greenery, consider the texture and color. Different types of greenery always add something special to every bouquet.
Arrange in Layers
Build your floral arrangement in layers, starting with larger flowers in the center and gradually adding smaller flowers and greenery around the edges. Remember to consider each flower’s height, color, and shape as you arrange them.
Take a Step Back and Assess
Take a step back and assess your arrangement. Look at it from all angles and make sure you’re happy with your layout. If you’re creating a centerpiece for your home, you’re at the final step! Simply add water through the grid and your floral food packet if you have one.
To extend the life of your arrangement, change the water every two days.
Final Steps for Bouquets to Gift
You’ll need a brown paper bag; ours is from Trader Joe’s.
Secure Everything
Once you’re happy with the arrangement, tightly wrap floral tape around the stems to hold everything together. If you don’t have floral tape, you can use a rubber band or even a piece of string!
Grab a brown paper bag for an extra personalized touch that can make all the difference. You will use this to wrap your flowers. Click here for the quick and easy tutorial we followed to give our bouquets that extra something special.
You are officially all set to make your own bouquet or flower arrangement. Whether you’re looking to gift a personalized bouquet or want some time to yourself, flexing your creative muscles and making your own arrangements is the perfect activity for anyone. Treat yourself this May and make your very own bouquet.